

Time to do some HACKING! Wait. Not THAT kind of hacking that can land you in the slammer. The clever kind that makes life a bit easier in whatever it is your attempting to hack. For us, it’s cake and sugar art. So many household items can be used in a variety of ways that we don’t necessarily think of. We need to open our boxed thinking and get creative! But first, let me tell you a story…It’s 2009 and I’m a wee intern with Ron Ben-Israel Cakes in Manhattan, New York. I’m doing what many interns do and taking in everything around me while keeping my nose buried in my assigned task. One of my most common tasks is making sugar hydrangea. (I can now hydrangea in my sleep.) Christmas break comes around and I’m inspired to get working on things at home, trying new flowers and such, but I know there are some tools I most definitely need. A gridded wire flower drying rack being at the top of my list. So I searched. I looked at every craft store near me. I was all over EVERY SUGAR WEBSITE out there from here to Timbuktu. Amazon. EBay.No one could help.
Desperate, I sent an email to Ron asking where he got these seemingly magical and elite sugar racks.
His answer blew me away: Bed, Bath and Beyond.
“Kara, they’re just shelf expanders.”
SMHROOMFN! (Smack My Head Right Off Of My Flippin’ Neck!) Yeah. Think outside the box, peeps. Lemme help.
Spoon Boards
Sugar flowers are fussy little critters and drying the petals requires certain shaping during key early drying time.
Can you use egg trays for deviled eggs? Yes! Do keep one on hand in your kitchen? Maybe not. Do you want to buy a fancy-schmancy one just for drying sugar petals? Not me. A spoon board is perfect for you then! Costing about 40 cents per board to make (at most!), and re-purposing scrap cardboard, you likely already have everything you need in your home.
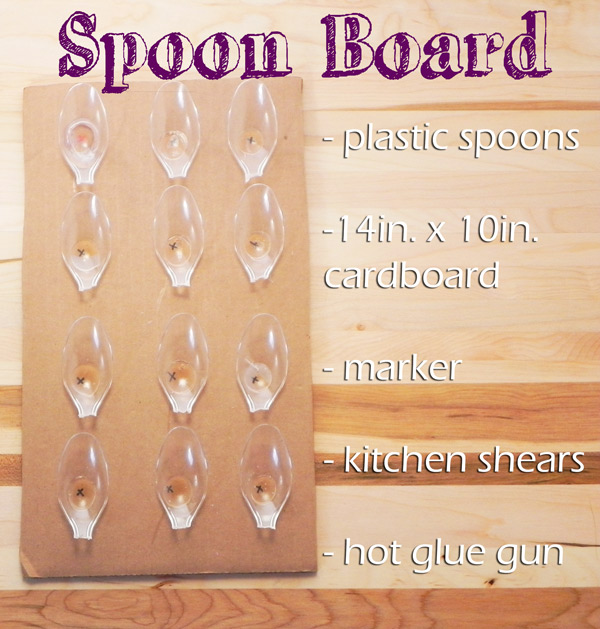
- Cut a rectangle of cardboard to approximately 14 inches by 10 inches
- Heat up your hot glue gun
- Mark tiny “X”s in a grid pattern, 3 columns by 4 rows
- Snip off the handles to 12 plastic spoons
- Place a dot of hot glue about the size of a peanut on your “X” and place your spoon, cupped side up, level and hold for just a second until the glue sets
- Repeat till your board is finished
If you can find different shaped spoons to make multiple shaped boards, that’s awesome! The rounder soup spoons will give you slightly different shaping to your sugar petals making them less identical and looking more natural. I tend to buy the 24 packs of spoons and make two boards at a time. They store flat and easy, and no worries if you drop them, unlike ceramic egg dishes.
Tights, the kind you get at the dollar store
Oh, tights. How I love thee. Let me count the ways!
Ok. There’s really just two ways I currently use them, but MAN do they come in handy! Remember those sugar flower petals we were just talking about? That little poofy filled sack on the right is full of corn starch (corn flour) to dust my work surface with for when I roll out gumpaste or cut my petals. Depending on the thickness of the tights, you will get a heavier dusting on your surface when you pat it with the sack.

The middle tight I use for straining gelatin that I use for my edible sequins or my edible glitter. Drape it around the rim and inside of a cup, pour your liquid gelatin into it, gather the top in your hand and pull the end upward, forcing the liquid gelatin through the bottom.
Voila! No lumps, or clumps of gel color left behind. Perfectly smooth gelatin that won’t clog your squeeze bottle or leave lumps on your spread out sheet.
Rinse it with warm water and dish soap to clean. If you’re using colored gelatins, it will stain it. But if you’ve washed it well, that color will not get into any further gelatin you strain through.
Ribbon, Flower Nail, Knitting Needles, and a Baby Food Jar?
What’s this stuff? Kara’s nuts.
Maybe. But I’m pretty certain you’ll love my nuts. Let’s go in order.

Ribbon:
I find myself CONSTANTLY losing my sewing tape measure (the soft ribbon-ish kind). Truly, I have no idea how it gets up and wanders off after I’ve put it away like I always do. (Stop rolling your eyes like my hubby…) So I’ve had to improvise. At the end of a spool of ribbon that I used for lining the outside edge of a cake board, there’s always that bit left that you hope to be able to find a cake board home for. Or it’s just a rarely used color and therefore destined to a life of solitude, being overlooked with every passing cake. I use these to measure routinely. I either fold over the ribbon where I need it marked, or I make a light pencil mark on it that can be erased later. I keep a spare ribbon or two in my tools bucket so it’s always handy. (YES! I know. Just put the measuring tape in there! It’s just too long and if it comes unwound it just annoys the bejeezus out of me.)
Flower Nail (for buttercream flowers)
These look awfully similar to another cakey tool: the baking core/pin for larger diameter cakes. Hmmmm…. No cores on hand to bake off that 3 inch deep cake or that 12 inch round? Use your buttercream flower pin inserted under a parchment round sticking up into where your batter will be filled. No need for a specialty tool, espeically when a flower nail is soooo common in our cakey kitchens.
Knitting Needles
What don’t I use these for? Curling edges of sugar petals. Helping to maneuver sugar petals once they are placed on the sugar flower. Adding little balled up bits of paper towel or tiny pieces of foam into the gaps in drying sugar flowers to create depth (fingers are just too big and awkward). To sculpt details in sugar figures or modeling chocolate details. To define lines in fine work like faces. To move small decor bits if they are sitting just a little bit uneven. One of THE BEST multi-pupose tools for sugar work. Just snip it in half with wire cutters so it’s not awkward to handle and you’re good to go!
Baby Food Jars
Perhaps I’m a container junkie. Perhaps I’m missing my baby years. Perhaps these are THE PERFECT little jars for things like sugar glue, my sequins or glitter, custom mixed petal dusts, or cocoa butter. At least those are things I use them for. Glass so they don’t absorb anything at all, cheap if you don’t have a kiddo, and re-purposing if you do.
Plastic Mesh Netting
Get some nice tomatoes-on-the-vine or a sack of oranges at the grocer lately? That netting they came in is a wonderfully cool texture. And stretchy! I wonder what that would look like rolled out over fondant… 😉 While this is one nett-y texture, there are so many things you come across daily that have incredible textures for embossing. No need to keep buying those embossing packages just for a simple texture. Look around!
Shelf Expanders
Yep. The same ones from above.
Found at any homegoods store, or anywhere you can find storage stuff.
Seriously how did I not get this?!?
They come in a variety of shapes and sizes, but I prefer the collapsible ones like this. The fixed ones take up too much space for my storage abilities. Some have these gorgeous grids (which I love to keep the sugar flowers from sliding into each other if I need to move it at all). Some just have parallel bars running width-wise. No matter what, they are immensely useful. But I’m picky. And you may be too.
I not only hang sugar flowers from the rack, but if you see my Sugar Rose video, you’ll see that I use them to hold sugar flowers upright for drying as well.


Hi Kara.
Thanks for hacking tips.
I use knee socks for cornstarch. They are great. I also use acupuncture needles for air bubbles on my fondant. These needles are very thin so they don’t leave big holes like regular needles.
That’s a fabulous tip! Thank you for sharing! 🙂
Hi dear Kara,
I use a plastic triangle ruler to make my cakes straight and to make sharp edges on my ganached cakes. Because of the straight angle of the ruler, the sides of the cake are automatically straight. Can you follow me? A very cheap tool which I could not do without anymore! Also dishwasher proof, so that is an absolute plus for lazy me too
Another great idea! I’ve done this once or twice and it’s nice to not worry about getting a perfect 90 degree angle!
Straws are great - cut across & use to imprint mouths on models. Cocktail sticks I use ALOT - for adding colour, detailing, as structure for models. Stackable letter tray to keep lots of fondant toppers together whilst drying in minimal space. Nothing particularly inventive I’m afraid. Oh I did “borrow” a playdoh tool from my son (washed of course) that made lego bricks!
It is so handy to have kiddos around with cake decorating! They have some cool stuff that we wouldn’t necessarily have in our lives otherwise. They’re minds are great to watch and learn about problem solving. They’d make great cakers if they didn’t eat it all.
GREAT stuff Kara, thanks for sharing………I do all of these already and they are super handy! I LOVE to keep a spray bottle around with water in it. I can find them under a dollar and they come in handy for me when I want to spray cakes down before covering them with fondant, after they have “crusted”. I also use it everyday for a “quick clean” of my airbrush cup. I spray some inside and blow out the color into my trashcan between color changes, until the cup runs clear.
Thank you, Bo! I was meaning to get one of those just a couple hours ago while I was out and TOTALLY forgot until you posted this! Thanks 🙂
Love this blog post Kara and all the Handy Hacks. I have a huge stash of fruit trays I use for drying various petals and they are free! I also use flexible cutting boards that I have cut into various sizes for smoothing out fondant in tough areas. Another favorite of mine are 4″ scraper razor blades. They made nice sharp cuts without pulling at the fondant. Great for working with tiny pieces.
That’s a great one Jeanne! And the supermarket never minds handing them over when you ask nicely 🙂
Te He! OIMG we are alike! I have even used a teapot to hand a flower out of..as you know i use a plastic bag and spoons to make petals! Kinda MacGyver Cake style! So its not just the hair in common! Lol MWAH!!! <3 you rock!
You are where I got the plastic bag idea from! I use it for mini free hand roses. I haven’t gotten up the nerve to attempt one of you life-sized incredible beauties though… yet!
Lovely hacks! God bless for sharing such beautiful joys us cake decorators to ease it out
Pop your tapemeasure inside one of the eggs you get the toy in from kinder eggs, no more unravelling! That’s what I do.
That genius!!!! And I’m certain I’ll remember where I put it if I draw a face on the egg. 🙂
Hi Kara, thank you for the amazing tips, when I make an all buttercream cake I let the buttercream set hard, then I measure some actual lace material and wrap around the buttercream, airbrush and then peel away slowly, and whala antique rustic lace effect, you can just wash the lace and use again and again and again lol x
Oh my goodness!!! I need to see pictures of this. It sounds incredible!
I can’t take the credit for this one but lauren kitchens recently opened my eyes as to other ways to cover cake boards. Use scrapbook paper especially if it’s got a nice pattern on it!! Glue the entire back side of paper then match up the patterns and stick it down. This way you don’t have to wait for your fondant to harden or worry about denting your fondant on the board. Also means you waste less fondant and scrapbook paper is pretty cheap.
And it’s so fun to shop for ! I get lost in all that wonderful color and paterns!
I do this, but instead of just gluing it, I cover the board and scrapbook paper with clear contact paper.
Here’s a hack I stumbled across at 1am while working on a checkered handbag cake! That same drying rack? Press it lightly into your fondant for an instant checkerboard pattern! It saved me SO much time on a night when I thought I had a checkered texture may and was wrong!
Very clever! See what we figure out when we’re in a pinch?!? Cakers are awesome.
Hi Kara,
Icing smoothing tools vary so much and some can get pretty pricey. I love heading over the hardware store to pick up fun tools for adding texture, like faux bios, sponge painting and more, but my very favorite section is the spackling tools. The cheap plastic scrapers have a fabulous sharp edge to them, creating a clean and perfect icing everytime and cost around $1.00!
$1.00 Who can’t love that?!?
My wife’s birthday is coming up in a few weeks. I really want to bake a cake for her. I have never baked a cake before, so it will be a learning experience. I don’t think it should be too hard to make a cake. Even if the cake comes out bad, my wife will still appreciate the effort. http://www.valleybakery.com/cakes.html
It’s always the thought that counts! I always use family birthdays to push my limits and try something new and see what I can figure out 🙂 It’s form the heart, I’m sure she’ll love it!
All perfect info and perfect timing! Thanks! I use the chip clips you get from ikea - really cheap and lots in a pack - for piping bags. My cake teacher and classmate thought it was a great idea and started using them too! We also use them to clip the opening of our milk bag- our youngest son would always open our fridge, poor the milk and go swimming!
I had a lock on my fridge until my 2 year old figured out to just pull hard enough and break it off… Smart little booger!
I had a cake to make that required several hundred plumeria and hibiscus flowers. My methods for making both of these flowers requires the petals be soft, formed, and the entire flower made instead of with a dry petal assemblage. To support the flowers in the shape I needed while drying my sister BRILLIANTLY suggested putting a couple inches of flour in a plastic storage bin, use my finger to poke a little starter hole then gently placing the flower into the hole. The flower can be manipulated to the shape I need and completely supported until dried. Just brush off the flour with a soft paint brush and you’re ready to colour. To transport those same flowers to the site I just dumped the flower and used the same storage container lined with 1/2″ quilt batting. I cut an “x” in a grid and placed each stem through that “x”. I placed another 1/2″ layer of batting on top and just kept stacking. Happy to say all the flowers arrived safely!
Holy Crow!!! I do the same with sugar plumeria! Such a seemingly simple flower but make it out of sugar?!? Yep. A little flour in a Tupperware bin and you’re golden!
Ack! That should read ” I just dumped the FLOUR (not flower!). Jimminy! Flowers in flour! 8 )
It’s actually a great and useful piece of info.
I’m happy that you just shared this helpful information with us.
Please stay us up to date like this. Thanks for sharing.
Hi Kara, always when I make my sugar flowers , I put close to me the portable clothesline this help me to much, before I go out to buy new things for cake or sugar flowers supply I look in differences places houseware story , that help me..a lot.
thank you for you wonderful blog.
So I was refilling my dusting puff (made from an unused stocking) only last week and was thinking if only I had 3 or 4 hands to keep the stocking open while pouring in the cornstarch. Usually it goes everywhere except in the puff but not this time. Get a glass place your dusting puff inside with the opening facing up. Stretch the opening of the puff over the edges of the glass and wholah you don’t need 3 hands anymore. The puff stays stretched over the glass and the cornstarch goes where it should. Then you can slide your opening side edges up and down to allow more room to fill it up as you progress. Made my bench way neater too!! So simple but so easy. Why didn’t I think of that earlier!!??
Hahaha! I used to try to stretch the stocking by hand, but I started getting the plastic, round mouthed container instead 🙂 I just stretch and pour now. And exactly… Why did I think of that sooner? No more boxes!
You can also use the round mouthed container to stretch your piping bag over while you fill it up. And I use the IKEA chip clips to hold the tips of my disposable piping bags closed while I’m not using them so the icing doesn’t run or dry out
Hello Kara,
I sometimes use cupcakes and mini-cupcakes baking cups to form or shape petal, flowers instead of getting the expensive flower former foam or plastic flower former.
It’s unexpensive and don’t need any cleaning, just throw them away when your flowers are dry 🙂
I don’t know if anyone has mentioned it yet or not, but I needed to make a ton of small fonfant flowers that were to be slightly “cupped.” My daughter had asked me to save the cardboard from a flat of eggs for my grandson’s craft project at daycare…well I put two and two together and my grandson’s craft project became the “cupper” for my 50 small fondant flowers! I just turned it upside down and it was the perfect shape for my little flowers to mold over! Now I save all of my empty flats!
I have to do a lot of small flowers and even the egg’s board wasn’t enough so I used all of my son’s marbles, washed very well and put there my flowers even I think the material of the marbles help the fondant to dry quickly.