

Have you ever designed something, put your heart and soul into it, felt like it could just about take over the world (or at the very least would be well loved by your tribe of peeps) only to have it fall flat?
It’s common. I’ve experienced it, and feel the crushing weight of “Why isn’t this more loved?” or “Why aren’t people responding the way I was SURE they would?”
My answer to this conundrum: designing a cake is a crapshoot. Oh yes, I said crapshoot. I can’t explain it, and if I could I think I would win the cake world. (I’m not sure what I’d win, but I’d definitely have a hit with every cake!) So I approached this one differently. But beware: this is not for the tame of heart…
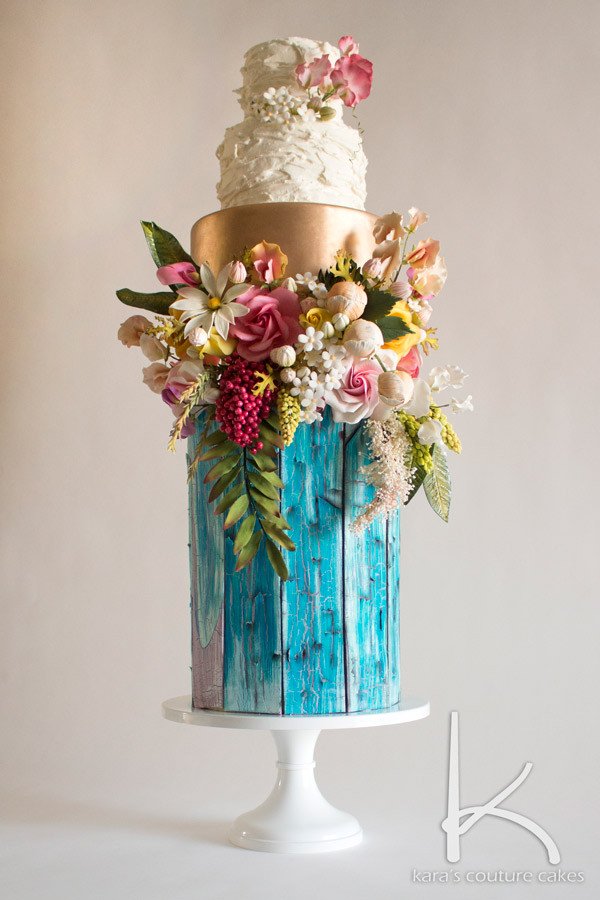
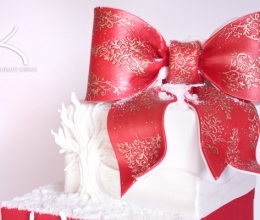
What on earth did I do, you may ask? Well I started the year looking at what upcoming trends were anticipated for the cake world. There were TONS of websites (here, here and here) that seemed to be listing all the same things, with a variation here and there. So I tried to design something that hit on a few trends: woodland (obviously), buttercream, tall, and metallic. Sugar flowers will always be on trend so of course I went nuts with them. 
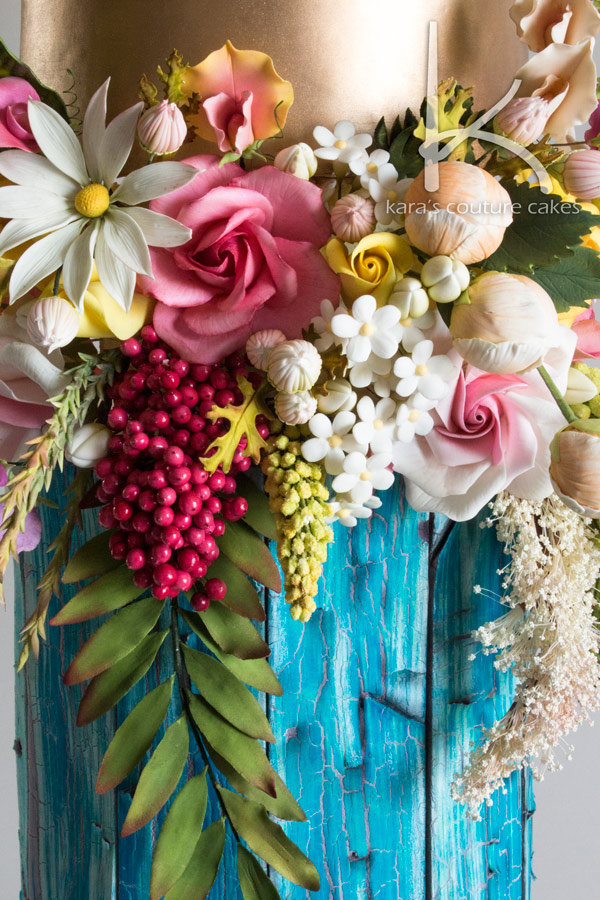
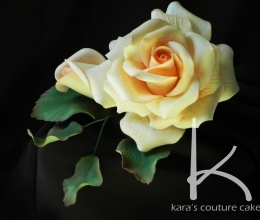
See? Over board. I binged on flower classes on Craftsy (Alan Dunn, another Alan Dunn, Jacquline Butler, and James Rosselle) but it was worth it! If you haven’t seen it, I have a sugar rose video tutorial that I made a couple years ago and FINALLY narrated it HERE. So I used my own tutorial for the roses. 😉 Many of the flowers are in fact my own, but those daisies, the grass, buds, some of the sweet pea, white blossoms… I owe those to Alan, Jacqueline, and James.
But that DAISY! Come on! First ever flower with individually wired petals. All of ’em. Alan is THAT GOOD!
My shimmering gold tier is, again my own tutorial which I watched again (not that I needed to, but it’s always fun to revisit earlier work and chuckle) because I was watching everything at that point.
But… What went over most wildly and what blew my mind was (drum roll please)…
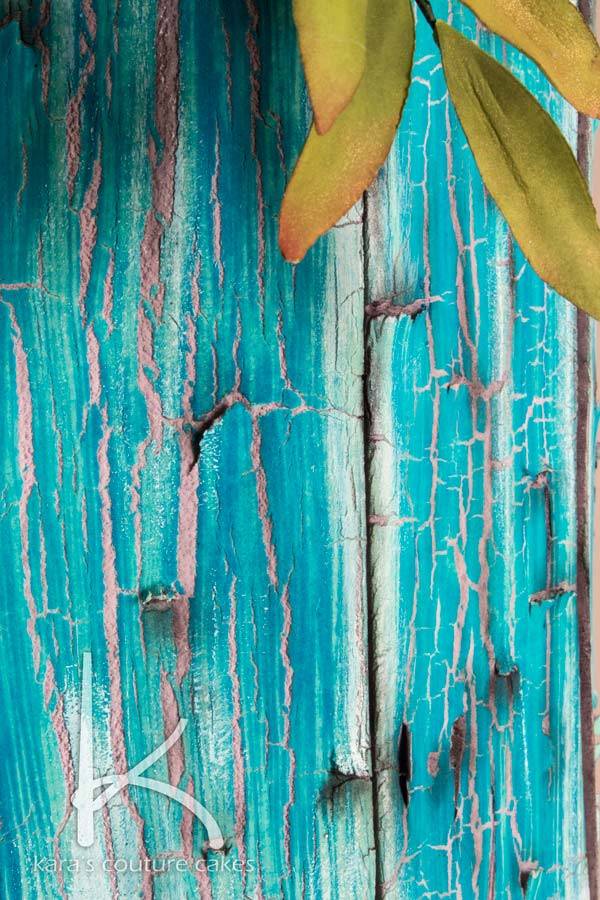
… the aged painted wood technique! Well, consider me gobsmacked. Yes. My gob is smacked. But let me tell you a little about why I created this to understadn why that happened to my gob (which is recovering nicely, thank you for asking).
This cake was a bunch of metrics combined in the hopes that it would be cool. I didn’t mention it above, but the color blue is an eye grabber online and on eye-candy sites like Pinterest. Blue is a motivator and draws people in. So that was to be a bold color in the cake’s design. It wasn’t just laid out easily. I hemmed and hawed for quite a while about many of the designs pieces, and those top two tiers of buttercream gave me HECK! Days of mulling and not being content with anything I thought of. Turns out, going with our good ol’ friend buttercream may be my favorite part of the cake. Fondant and buttercream can live in harmony
I digress. Back to the aged wood panels and the blue…
The amount of requests I got instantly for that technique and a tutorial were ridiculous. Good ridiculous, but ridiculous. I know woodland is “In” right now, but most have leaned towards bark textures. I’m not a bark-y kind of gal so this was my solution, and people love it It made me happy.
I followed trends and metrics to make a cake. I left very little to my own design instincts compared to usual. (which I don’t actually recommend). So this may all leave you wondering why I’ve written this blog post?
To say THANK YOU! A huge, whopping thank you for loving me and my work. I’ve never expected people to be so interested in the artwork I create with food, but you do. It’s still crazy to me after all these years. But I need to thank you for how awesome YOU are and for how humbled you make me feel.
Thank you.
If you’re interested in the Aged Painted Wood Technique, you can see it in my shop HERE.


Kara, I would love to learn how to create a flower tier separator like yours into my wedding cakes. I just cannot figure it out and I know it is simple. I like a tutorial on how to incorporate dummy tiers into your wedding cakes, not just as the topper or base.. PS love your work and cake is lovely!
I actually use the same technique as James Rosselle. And since i don’t have a tute, his Craftsy class would be PERFECT for you! http://www.karascouturecakes.com/siteb/4byu
That cake is jaw-droppingly gorgeous!!
Well, thank you
Love, love this cake. Just ordered your tutorial, yay! Would you be able to tell me what color(s) you colored your fondant prior to the gold luster and what color gold luster was used? Thanks so much!
Thank you for the kind words! The fondant here was white, I didn’t tint it this time since I didn’t want it to be too bold. The gold dust I used was from Swank Cake Design. I believe the brand is called “Ideal”.
Just be aware Lyn that the ideale gold is non-edible and can only be used on decorative pieces. (Sorry Kara for jumping in here ;-). )
No worries, Ellen! Good, sound advice
AMAZING!!!! So much attention to detail. Those flowers are stunning and breath-taking. I’m just a newbie and have currently enrolled in some online courses so hopefully with a TON of practice, some day my flowers might look as gorgeous as those!
Practice is all it takes Have fun!
Absolutely adore this cake Kara. So flamboyant (in a totally good way!!!!)
Hahaha! I’m good with flamboyant. It’s a wonderfully descriptive word.
So very gorgeous Kara!! Your flowers are perfection and that aged painted wood- AMAZING!!
Hi Kara your cake is STUNNING, you really are amazing!
I must confess I had pinned a few aged wood images with the goal of trying to come up with a way of using that inspiration on a cake, I just hadn´t thought of a way to do it (wafer paper and dusts popped into my head at the time) and OMG you just did it so brilliantly!
Thanks so much for creating a tutorial with this technique, I will buy it for sure, can´t wait to see it
That’s very sweet of you, Sarah! I’m glad you like it. Please share anything you make with the tute on my Facebook page. I’d love to see it!
You inspire me! I found you on Craftsy. ..trailed you to your blog…read your book/story….got further hooked. …and now this….love love love it. When I grow up * ?I want to find inspiration just like you! I had to zoom on that woodland technique. …right on perfect …even with peeling paint!?
Oh, Nicki… These kinds of sweet comments get me all kinds of bashful and red in the cheeks thank you! I’m glad you enjoy my craziness, that’s why I put it all out there. LOL
Thank you so much for sharing this beautiful cake and his w it came to fruition. It is beyond beautiful!
Hi awesome Kara!!! I’ve just got this incredible tutorial and I’m counting the minutes to go home and give it a try. I peeped though, and you mentioned a brand of fondant. It has to be THAT brand (I don’t have it in my country), or can be done with any other? Thank yousoooomuch!!!! XoXo
If not that one, find one you know of with the same qualities I mentioned And come back and share what you make!!!
I’m having problems with the link to the tutorial; I got an error message. Could you direct me please?
Hi Dawn! You get to the tute HERE