Love is a theme that is usually at the heart of our sweets making and giving. It’s kinda cool that such a great motivation is what drives us. And this time of year we have Valentine’s Day is reminding us of those we love. 😉
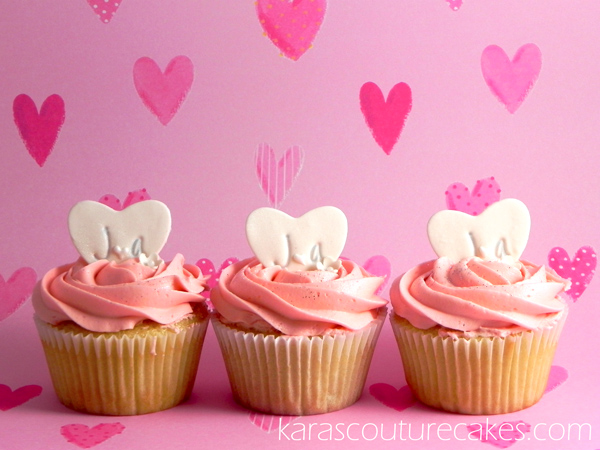
A couple years back I made these cuppies for a bridal shower and was asked to add just something sweet, simple and personal as decor. I immediately thought heart and monogram, but I didn’t want to complicate things too much; the Tiffany charm came to mind with it’s engraved letters and simple shape… And these little adornments were born!
So I thought I would share my technique with you. Yes. Two years later. I practice procrasti-caking. Don’t act like you don’t!
I visited the craft store and went browsing for some letter stamps that were small and had a kind of handwritten style font. I loved the ones I found and they were the perfect size.
Starting with a piece of clear packaging tape and the letters l-o-v-e, I taped the letters to each other so they wouldn’t move and they would be perfectly aligned when stamping. Doing this also creates a perfectly replicated design if you are doing cupcake toppers or any decor that you need to repeat. I love consistency! (OCD much?)
Luckily the tape and the letter stamps have beautiful straight lines. It’s easy to line up the stamps to the edge of the tape and along side the other stamps. Nice and neat all in a row. Turn them up on there end once they are laid out and stuck on the first side. And then over once more onto the last side to sandwich the letters between the tape. Give it a good press to be sure they are suck snugly to the tape. Pinch and wrap the ends so they seal the side of the letters as well.
Next get out a piece of fondant or gumpaste, you can even use modeling chocolate if that’s your fancy. Also a little poof of corn starch or confectioner’s sugar, and a small rolling pin.
Roll out your paste thin (about 1/16th of an inch) and as wide as you need for the cutter you will use around your letters. I’ve chosen a heart shape (duh Kara!) and sized my gumpaste accordingly. Gently center and press you letters into your paste. Don’t push too deeply or the recessed portions of the stamp will register on your gumpaste. A littlepressure goes a long way!
Ta Da! Perfectly spaced and aligned letters!
Next take your cutter, center the letters inside of it and cut out.
“Why not cut your heart first then lay the letters in?” you may be asking… Great question! I do this because depending on the amount of letters you use, the amount of pressure you use, and how close they will ultimately be to the border of the cutter, it can press and distort the gumpaste and make your shape irregular. If you cut afterwards, you have a perfect cut shape.
Now, if you like something smaller, personalized, a bit more organic, with a bit of color or want the letters to pop a bit more…
I placed the “m” and “g” by hand and the cut the heart around it. I left a space in the middle to add a royal icing hear, like the picture at the top of the page, or a painted heart.
I painted the heart and decided I wanted to see the letters more. The impression of the stamp makes for a great guide to lay color in and not get all shaky about free-handing them. A good fine brush (like this 000) is best for small details and tracing in those tiny spaces. Americolor Fuchsia AirBrush color acted as my paint.
Happy Valentine’s Day everyone! <3


Thank you so much for sharing your new recipe with us, can’t wait to try it!
I had a quick question- on the cupcakes featured in the love letters tutorial, could you tell me what that shimmer is? I see a hint of sparkle and that’s just what I’m looking for.
Thanks again for everything you gave shared.
At that time it was the now know “No No” disco dust. But there are better and actual edible options available now like my edible gelatin glitter found here: http://www.karascouturecakes.com/siteb/edible-gelatin-glitter.