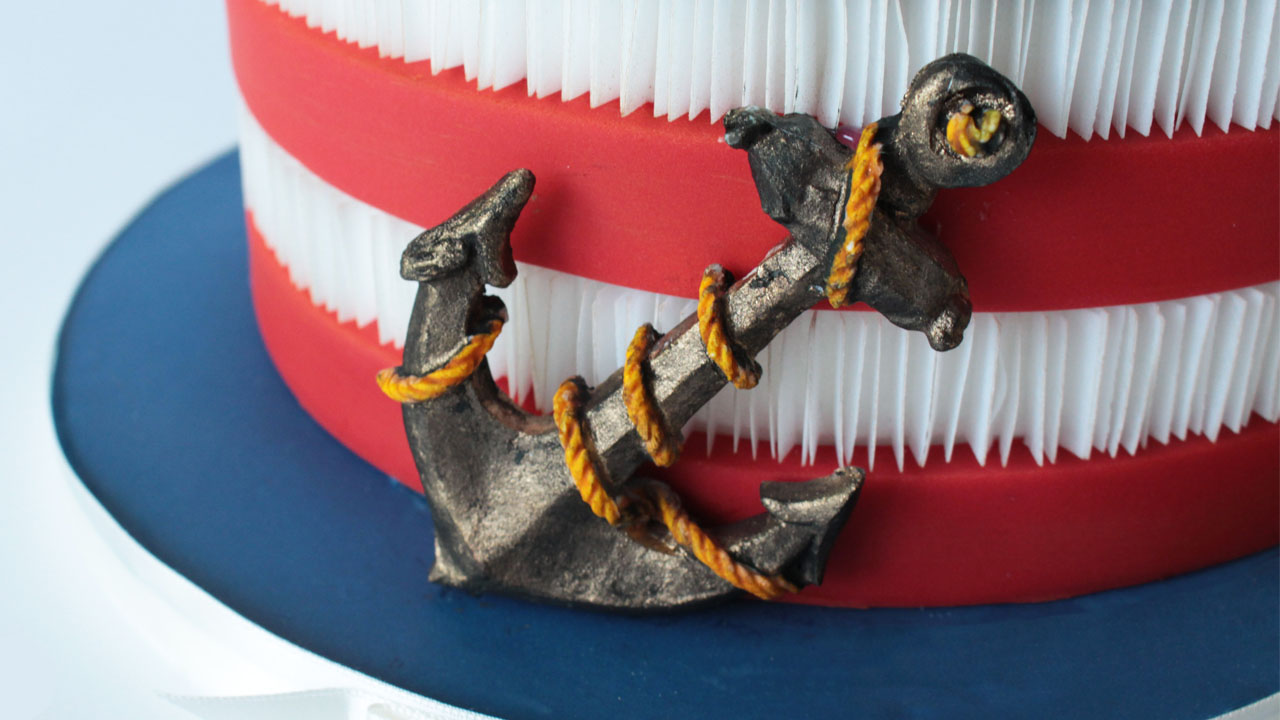
This nautical cake was in my head for a while. But just the cake.
Not the anchor.
As I finished that awesome inlaid wafer wrap, I just KNEW that it needed something more. It was practically screaming at me, “KARA!!! I’m still NAKEY!!!” (yep, it knew it was nakey.)
I’ve had a nautical decor preoccupation for quite some time now and this was the perfect excuse to head out to some craft and decor store to search for an anchor. Or seven. And some throw pillows. I digress…
But how to make that anchor LOOK like and old, aged anchor, metal and all??? I figured I would just throw some stuff against the molded sugar piece and see what happened.
It.
Was.
GENIUS!
Here’s what happened after I molded the sugar piece…
I started with rectified spirits (Spirytus Rektifikowany) which is 192 proof (96% alcohol). Yeah. That’s serious stuff. And then I added my gold highlighter. You can get edible gold highlighter/luster HERE. Mix ’em up good, peeps!
Make sure you have a good flat ended paintbrush to get into the detail areas. This is a filbert. Meet Filbert.
I painted the gold highlighter onto the anchor part, careful not to get any one the rope. See how nice Filbert works in there?
I needed a slightly smaller brush as well to get into some of the even tinier spots. That’s Iggy. (hey. Filbert has a name. The other brush wanted one, too.)
Now THIS is where the magic happens! We’re going to add deep black petal dust (find it HERE) to the gold highlighter using round tipped brush. The highlighter is still a bit fresh as is the fondant I’ve molded. The entire finish just works better with all fresh stuff.
Really load your brush up on the end and work the dust into the highlighter. This is not meant to be a gentle or delicate technique. Just do your best to keep as much black dust off your white ropes as possible.
After you’ve worked the dust into all of the gold highlighter, gentle blow the excess dust away. (And I don’t wanna see any sass in the comment below about this… You’re gently blowing, not spitting every last bit of mucus you can summon. Simmer down, folks!)
I used gel colors on this application, both electric yellow and egg yellow. In the video at the bottom of this post you’ll see I used airbrush color for that one. (I’ve made quite a few of these. They are soooooo super easy and quick!)
After the yellow color for the ropes, I wanted to define and deepen some of the shadowy areas. It also helps to make the highlighted gold areas really POP if there is a bit more darkness hangin’ ’round.
And there you have it 
Fully edible, aged metal sugar decor!
It’s a beautiful faux finish that I’ve fooled many people with so far. They truly though I just slapped a metal decorative piece onto my cake.
But if you know me, you know I do not dig non-food things on my cake. Eva. So there you have it!
Check out the video just below of me working in (mostly) real time with a few extra tips and tricks added in for good measure.
In the comments below, tell me how YOU would use this technique! I would love to hear your ideas.
If you like this post, please be sure to share it. I would very much appreciate it 


Hi Kara, Thank you for sharing this technique Love your work and your teaching videos.
I love, love, love this technique! Thank you for sharing with all of us - I am so excited to use this and must create something NOW!!!
Just used an almost identical technique on a Thor helmet & hammer cake. It turned out amazing! http://www.facebook.com/vintagekitchencakes